How to Install Laptop RAM: Step-by-Step Upgrade Guide (2026)
Upgrading your laptop’s RAM is one of the fastest and most affordable ways to breathe new life into an aging machine. Whether you’re dealing with laggy performance, too many browser tabs, or creative applications that demand more memory, a simple RAM upgrade can transform your laptop from sluggish to snappy. Unlike storage upgrades, which require technical knowledge and recovery drives, upgrading RAM is straightforward—most users can complete the job in under 30 minutes with just a few basic tools.
This guide walks you through every step of the process, from checking your laptop’s compatibility to installing the new modules and verifying that everything works correctly. We’ve included brand-specific tips for Dell, Lenovo, HP, ASUS, and Acer, plus detailed troubleshooting advice if something goes wrong. Whether you’re adding a second stick to your laptop or replacing both slots, you’ll find the answers you need here.
By the end of this guide, you’ll understand how to identify the correct RAM for your laptop, safely remove and install modules, and verify that your upgrade was successful. Let’s get started.
Before You Start: Check Your Laptop’s RAM Compatibility
Before you buy new RAM, you need to know exactly what your laptop supports. Installing incompatible RAM won’t damage your hardware, but it simply won’t work—and you’ll waste money on modules that don’t fit your machine. Fortunately, checking your laptop’s RAM specifications takes just a few minutes.
How to Check Your Current RAM and Laptop Specs
The easiest way to check your current RAM is to use Windows Task Manager (or Activity Monitor on Mac). Press Ctrl+Shift+Esc on Windows to open Task Manager, then click the Performance tab. You’ll see your installed RAM listed at the top—for example, “16GB” or “8GB”—along with how much is currently in use. This tells you both the total capacity and how much memory is being used right now.
For more detailed information, use CPU-Z, a free utility that shows exact RAM specifications including the DDR generation (DDR4 or DDR5), speed (MHz), and form factor (SODIMM, which is what laptops use). You can also check System Information in Windows by pressing Win+Pause/Break or searching “System Information” in the Start menu.
DDR4 vs DDR5: What’s the Difference?
This is critical: you must install the same DDR type that your laptop uses. The two main generations in 2026 are DDR4 and DDR5. If you install DDR5 RAM into a DDR4 laptop—or vice versa—the module physically won’t fit because the notch position is different. DDR5 is newer, faster, and more power-efficient, but most laptops from 2024 and earlier use DDR4. Only recent 2025–2026 models use DDR5. Check the specifications of your exact laptop model before purchasing.
Max Capacity and Slot Configuration
Most laptops have either one or two RAM slots. Some premium ultrabooks (like the MacBook Pro or Dell XPS) have soldered RAM, meaning the memory is permanently attached to the motherboard and cannot be upgraded. Check your laptop’s specifications online to find:
- Number of RAM slots (1 or 2)
- Maximum supported capacity per slot (usually 8GB, 16GB, or 32GB)
- Total maximum RAM (typically 16GB, 32GB, or 64GB)
- Supported speeds (3200MHz, 4800MHz, 5600MHz, etc.)
For a detailed breakdown of what your specific laptop model supports, check our RAM Compatibility Guide, which covers DDR4, DDR5, LPDDR5, and SODIMM form factors in depth.
Soldered vs Socketed RAM
Most Windows laptops have socketed RAM, meaning the memory modules sit in slots and can be removed. However, many MacBooks, ultraportables, and gaming laptops have soldered RAM that’s permanently glued to the motherboard during manufacturing. If your laptop has soldered RAM, you cannot upgrade it—this is fixed at purchase. Always verify your laptop’s upgrade potential before assuming you can add more memory.
Tools You’ll Need
Good news: you don’t need much to upgrade RAM. Most of these tools cost less than a cup of coffee, and many you probably already have at home. Here’s what you’ll need:
| Tool | Purpose | Cost | Amazon UK Link |
|---|---|---|---|
| Phillips Screwdriver (#0 or #1) | Remove/reinstall bottom panel screws | £2–£5 | Phillips Screwdriver Set |
| Anti-Static Wrist Strap | Prevent electrostatic discharge (optional but recommended) | £3–£8 | Anti-Static Wrist Strap |
| Spudger or Plastic Pry Tool | Safely pry open clips without scratching | £2–£4 | Spudger Pry Tool Kit |
| Soft Workspace (Mat or Towel) | Prevent scratches and provide grip | Free | — |
| Flashlight or LED Headlamp | See inside the laptop clearly | £2–£10 | LED Headlamp |
| Container for Small Screws | Keep track of screws so you don’t lose them | Free | — |
Pro tip: Many laptop repair kits bundle all of these tools together for £10–£15. Search “laptop repair toolkit” on Amazon UK to find affordable bundles that include screwdrivers, spudgers, and anti-static equipment.
Step-by-Step: How to Install RAM in a Laptop
Now for the main event. Follow these steps carefully, and you’ll have upgraded your laptop’s RAM in no time. This process typically takes 15–30 minutes, depending on how easily the bottom panel comes off.
Step 1: Back Up Your Data
Before opening your laptop, back up your important files. This isn’t just about the RAM upgrade—any time you open your machine, there’s a small risk something could go wrong. Use Windows Backup, OneDrive, or an external drive to create a safety copy of your data. This takes only a few minutes and gives you peace of mind.
Step 2: Power Down Completely and Disconnect Everything
Shut down your laptop fully—don’t just put it to sleep. Unplug the power adapter, disconnect all USB devices, and remove the battery (if it’s removable). If your laptop has a non-removable battery, simply leave it powered down for at least 5 minutes to let residual charge dissipate. This is essential for safety and to prevent accidental component damage.
Step 3: Remove the Bottom Panel
This step varies by laptop brand. Most laptops have a removable bottom panel secured by a handful of screws (usually 4–10). Lay your laptop upside-down on a soft surface (a towel or mat works great) and carefully examine the bottom. You’ll see screws arranged around the edges.
Important: Different brands have different designs.
- Dell (XPS, Inspiron, Vostro): Usually a single aluminum panel held by 6–8 Phillips screws. Some XPS models have a pull-tab design—gently peel back the felt strip to access the screws underneath.
- Lenovo (ThinkPad, IdeaPad): ThinkPads are famous for being upgrade-friendly. A single screw or latch at the top, plus a few screws around the edge. The panel usually slides toward the screen to release. IdeaPads may have snap clips instead of screws.
- HP (Pavilion, Envy, ProBook): Often uses plastic clips around the perimeter rather than screws. Use a spudger to gently pry the panel off, starting at a corner. Work your way around slowly to avoid cracking the plastic.
- ASUS (VivoBook, Zenbook, ROG): Similar to HP—clips or a combination of screws and clips. Check your exact model online for the specific release method.
- Acer (Aspire, Swift): Typically uses 6–8 screws with some models featuring clips. Remove screws first, then gently pry.
If you’re unsure about your specific model, search “[Your Laptop Model] how to open bottom panel” on YouTube—most popular laptops have quick video tutorials showing exactly where the screws or clips are.
Once the panel is off: Set it aside in a safe place. Keep all screws organized (use a small container or lay them in order). The inside of your laptop will now be exposed.
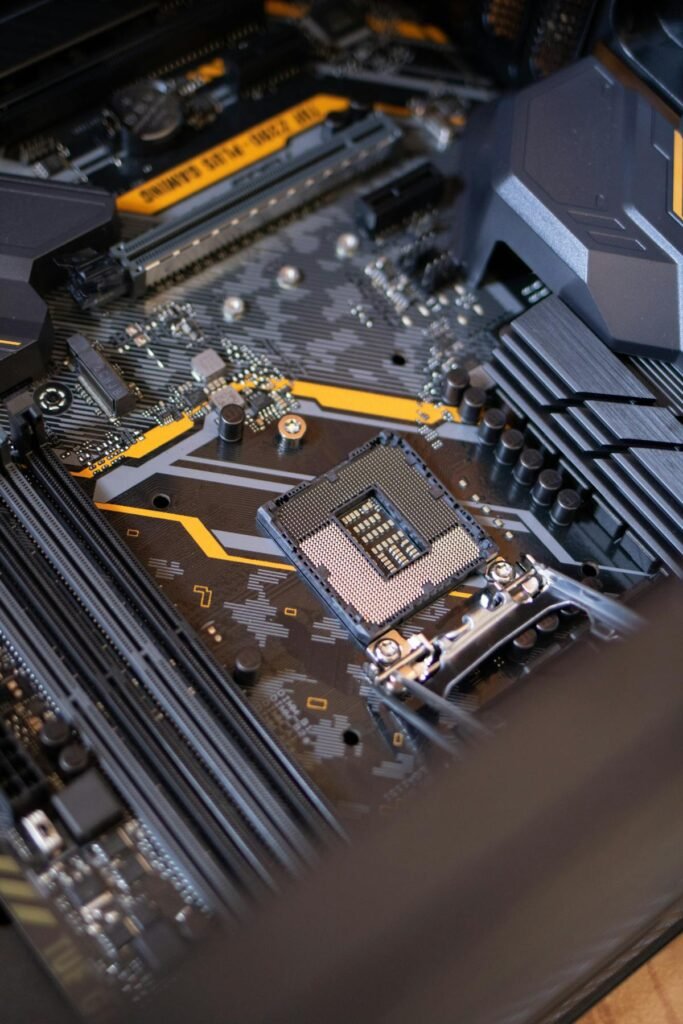
Step 4: Locate the RAM Slots
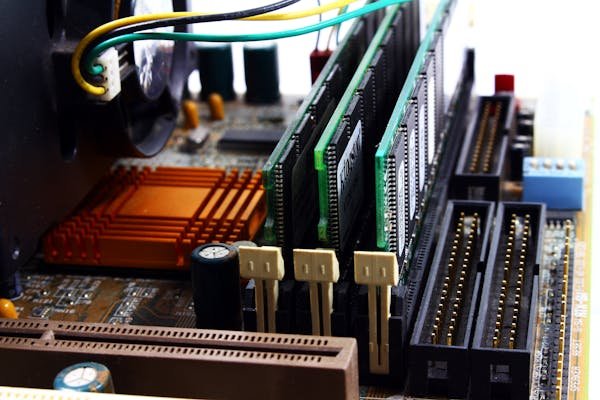
Inside your laptop, look for the RAM modules. They’re usually located near the center or toward one side of the motherboard and are unmistakable—small rectangular modules, usually 2–3 inches long, sticking up at a 90-degree angle or lying flat (depending on whether the laptop is open or closed). You may see one or two of these modules, depending on your laptop’s configuration.
RAM modules are typically black, green, or silver. If you see multiple sticks, they’re probably spaced a few inches apart. Don’t confuse RAM with the SSD storage drive, which is larger and often has a heatsink covering it.
Step 5: Remove Existing RAM (If Replacing)
If you’re replacing existing RAM rather than adding a second stick, you need to remove the old module first. At each end of the RAM module, you’ll see a small plastic clip. Gently push both clips outward (away from the RAM) simultaneously—the module will spring up at a 45-degree angle. Grab the edges of the module (not the gold pins) and carefully pull it straight out.
Be gentle: These modules are delicate. Never force them. If a module isn’t budging, double-check that both clips are fully released before pulling.
Set the old module aside. If you’re reusing it in another slot, store it in a static-safe bag or on a clean surface away from liquids.
Step 6: Insert the New RAM Module
This is the critical step—take your time here. Line up the new RAM module with the slot. Important: The module has a notch (a small cut in the gold pin edge) that aligns with a key in the slot. This prevents you from inserting it backward. If the module doesn’t slide in smoothly, you may be trying to insert it backward or upside-down—check the alignment.
Holding the module at a 45-degree angle, align the notch with the key in the slot. Now slowly push the top of the module downward until it lies flat and parallel to the motherboard. You’ll feel a slight resistance as the gold pins enter the slot. Push firmly and evenly on both ends—the plastic clips at each end will snap inward (toward the RAM) when fully seated. You should hear or feel a soft “click” when the module is fully inserted.
How to know it’s properly installed: The RAM module should lie perfectly flat, parallel to the motherboard. The plastic clips at the ends should be snapped all the way in. If the module is still at an angle or the clips aren’t fully closed, it’s not seated properly—gently pull it back out and try again.
Pro tip for two modules: If you’re installing two modules in separate slots, insert the outer one first, then the inner one. This gives you more room to maneuver the inner module without bumping the outer one.
Step 7: Reassemble and Test
Replace the bottom panel. If your laptop uses screws, reinsert them in the same order you removed them—don’t overtighten. If your laptop uses clips, press down around the entire perimeter until all clips snap into place and the panel sits flush with the chassis.
Reconnect the power adapter (and battery, if removable) and power on your laptop. You should see no unusual beep codes or error messages. If everything sounds normal, proceed to the next section to verify your upgrade worked.
How to Verify Your RAM Upgrade Worked
Once your laptop boots up successfully, confirm that it recognizes the new RAM. There are three easy ways to check:
Method 1: Task Manager (Windows)
Press Ctrl+Shift+Esc to open Task Manager. Click the Performance tab on the left. Look at the “Memory” section at the top. You should see your new total RAM amount. For example, if you upgraded from 8GB to 16GB, Task Manager should now display “16GB” at the top of the memory graph.
Method 2: System Information
Press Win+Pause/Break or search “System Information” in the Start menu. Scroll down to find “Installed RAM”—it should match your new total.
Method 3: CPU-Z (Advanced Users)
Download the free CPU-Z utility. Run it and click the “Memory” tab. You’ll see detailed information including DDR generation, speed, capacity, and even which slots are populated. This confirms not just the capacity, but the exact specifications of your new modules.
Brand-Specific Tips
While the basic process is the same across all laptops, each brand has quirks. Here’s what you should know about the most popular manufacturers:
Dell (XPS, Inspiron, Vostro)
Dell laptops are generally easy to upgrade. XPS models are slightly more challenging due to their premium aluminum chassis, but still manageable. On XPS 13/15, you’ll find a felt pull-tab on the bottom panel—gently peel it back to reveal the screws underneath. The RAM slots are typically located near the battery. Dell often uses one soldered RAM module plus one upgradeable slot, meaning you can’t remove the first module but can add a second. Check your model’s specifications carefully. Most Inspiron and Vostro models have two fully upgradeable slots, making them the most flexible for upgrades.
Lenovo (ThinkPad and IdeaPad)
ThinkPads are legendary among tech enthusiasts for upgrade-friendliness. Most ThinkPads have a dedicated access panel held by a single screw. Remove the screw, slide the panel toward the screen, and lift it away. The RAM slots are immediately visible. This design is so efficient that you can upgrade a ThinkPad in under 10 minutes. IdeaPads are slightly different—some use screws, others use plastic clips. The process is similar, but check your specific model’s manual. IdeaPads with clips require gentle prying with a spudger.
HP (Pavilion, Envy, ProBook)
HP laptops typically feature plastic clips rather than screws for the bottom panel. This is fine, but requires a gentler touch. Use a plastic spudger and pry at one corner, working your way around the perimeter. Once the panel is off, locate the RAM slots near the center of the motherboard. HP usually places RAM away from storage drives, making it easy to identify. ProBook models are even more user-friendly and often have labeled RAM slots.
ASUS (VivoBook, Zenbook, ROG)
ASUS designs vary widely depending on the model. VivoBooks and mid-range models typically have screws and are straightforward. Zenbooks (ultraportables) may have clips and tighter spacing. ROG gaming laptops usually have large access panels and spacious RAM slots. Check your exact model online, as ASUS has more variance than other brands. Once you locate the slots, the installation process is identical to other laptops.
Acer (Aspire, Swift)
Acer laptops generally use a combination of screws and plastic clips. The bottom panel usually comes off without much fuss. Swift models are thin and compact, so expect tight spacing around the RAM slots—use care when inserting modules. Aspire models offer more room. RAM is typically accessible immediately after opening the bottom panel, with no additional components to move out of the way.
Common RAM Upgrade Mistakes to Avoid
Even though RAM installation is straightforward, a few common mistakes can derail your upgrade. Here’s how to avoid them:
Mistake 1: Installing the Wrong DDR Type
The number one error: buying DDR5 RAM for a DDR4 laptop (or vice versa). These modules have notches in different positions and physically won’t fit. Always verify your laptop’s DDR generation before purchasing. If you’re unsure, use CPU-Z to check your current RAM generation.
Mistake 2: Wrong Speed or Timing
While a slightly faster RAM module will work in a laptop that supports a slower speed, it will run at the lower speed. This isn’t harmful, just a waste of money. Always buy RAM at the speed your laptop supports. Check your motherboard’s manual or use CPU-Z to find the maximum supported speed.
Mistake 3: Mixing RAM Capacity or Brands
You can mix different brands (Crucial, Kingston, Corsair, Samsung) without problems. However, mixing different capacities (e.g., 8GB + 16GB) may cause issues on some laptops. For best stability, install matching pairs. If your laptop already has 8GB installed, buy another 8GB stick to match—this is called “matched pairs” and ensures compatibility. On some older laptops, mixing causes dual-channel mode to fail, reducing performance.
Mistake 4: Not Grounding Yourself
Electrostatic discharge (ESD) can damage components. Before touching RAM, ground yourself by wearing an anti-static wrist strap connected to a metal part of the laptop chassis, or by touching a metal part of the laptop with one hand while installing with the other. This dissipates static charge safely. While modern components are fairly resistant to ESD, it’s better to be safe.
Mistake 5: Forcing the Module
RAM modules should slide into their slots with minimal resistance. If you’re forcing it, something is wrong. Check the notch alignment. Check that the clips are fully open. Check that the module isn’t upside-down or at the wrong angle. Never use excessive force—you’ll damage the gold pins or crack the slot.
Mistake 6: Overtightening Screws
When reassembling the bottom panel, hand-tighten screws only. Overtightening can crack the chassis or strip the screw holes. If a screw feels stuck, it’s probably tight enough already. You should be able to tighten and loosen all screws with one hand using a light grip.
Troubleshooting: RAM Not Working After Upgrade
In rare cases, your laptop may not recognize the new RAM immediately. Here’s how to diagnose and fix common issues:
Problem: Laptop Won’t Boot
Solution: The module isn’t fully seated. Power down, remove the bottom panel again, and reseat the RAM. Push both ends down firmly until the clips snap into place. Reboot and check if Task Manager now shows the correct capacity.
Problem: Laptop Powers On But No Display
Solution: The RAM module may be slightly loose or not compatible. Try these steps: (1) Power down, remove the module, reseat it firmly, and reboot. (2) If that doesn’t work, try installing the module in the opposite slot (if your laptop has two slots). (3) If you added a second module, try booting with just the new module installed (and the old one removed) to isolate the problem.
Problem: Laptop Won’t Boot but Makes Beeping Noises
Solution: Beep codes indicate hardware issues. Different patterns mean different problems—typically one long beep + two short beeps means a memory error. Power down, remove the RAM, and inspect the gold pins for dirt or damage. If the pins look clean, reseat the module and try again. If the problem persists, try a different RAM module or return it for a replacement.
Problem: One RAM Module Not Recognized
Solution: If you installed two modules but Windows only shows one module’s capacity, one module may not be fully seated. Reseat both modules. If the problem persists, try swapping the modules’ positions—place the new module in the first slot and the old one in the second slot. If only one module works regardless of position, the non-working module may be defective and needs to be returned.
Problem: BIOS Shows Less RAM Than Installed
Solution: Check your laptop’s BIOS settings (press F2, F10, or Del during startup, depending on your laptop’s manufacturer). Some laptops have a BIOS setting that limits maximum RAM. Disable any “memory limiting” options and reboot. This is rare but can happen on older laptops or if someone previously restricted the max RAM.
Recommended Laptop RAM Upgrades
Not sure which RAM to buy? Here are some of the most popular and reliable options available on Amazon UK in 2026:
| Product | Capacity | Type & Speed | Best For | Amazon UK |
|---|---|---|---|---|
| Crucial DDR4 SODIMM | 8GB, 16GB, 32GB | DDR4, 3200MHz | Budget upgrades, older laptops (2015–2023) | View on Amazon |
| Crucial DDR5 SODIMM | 16GB, 32GB | DDR5, 4800MHz–5600MHz | Newest laptops (2025–2026), best value in DDR5 | View on Amazon |
| Kingston Fury Impact DDR4 | 16GB, 32GB | DDR4, 3200MHz–3733MHz | Gaming laptops, high-performance needs, DDR4 | View on Amazon |
| Kingston Fury Impact DDR5 | 16GB, 32GB | DDR5, 5600MHz | DDR5 gaming laptops, creators, high-end users | View on Amazon |
| Corsair Vengeance DDR4 SODIMM | 16GB, 32GB | DDR4, 3200MHz–3733MHz | Reliable brand, good performance-to-price ratio | View on Amazon |
| Corsair Vengeance DDR5 SODIMM | 16GB, 32GB | DDR5, 5600MHz | DDR5 builds, premium performance | View on Amazon |
| Samsung DDR5 SODIMM | 16GB, 32GB | DDR5, 5600MHz | Premium laptops, excellent reliability | View on Amazon |
| SK Hynix DDR5 SODIMM | 16GB, 32GB | DDR5, 4800MHz–5600MHz | OEM replacement, reliable, good value | View on Amazon |
| Micron Crucial DDR4 Low Power | 8GB, 16GB | DDR4, 3200MHz LPDDR | Ultra-thin laptops, MacBook replacements | View on Amazon |
| Transcend JetRam DDR4 | 8GB, 16GB, 32GB | DDR4, 3200MHz | Budget-friendly option, solid performance | View on Amazon |
Quick recommendation: If your laptop uses DDR4 (most 2015–2023 models), buy Crucial DDR4 for the best value or Kingston Fury for higher performance. If your laptop is DDR5 (2025–2026 models), buy Crucial DDR5 for value or Samsung/Kingston for premium reliability. All of these brands are reliable and come with lifetime warranties.
Frequently Asked Questions
Can I upgrade the RAM in any laptop?
Most laptops with Windows or Linux operating systems can be upgraded—that’s the beauty of socketed RAM. However, some premium laptops (especially Apple MacBooks, Dell XPS 13, Lenovo Yoga, and other ultraportables) have soldered RAM that cannot be removed. Always check your laptop’s specifications before purchasing RAM. If it says “soldered” or “non-upgradeable,” you cannot add more memory.
How do I know if my laptop RAM is soldered?
Search your laptop model plus “RAM upgrade” on Google. If the search results say “non-upgradeable” or “soldered RAM,” then it is. You can also open the laptop and look: soldered RAM appears as black or green chips permanently attached to the motherboard without visible clips. Upgradeable RAM sits in a slot with clips at both ends.
Can I mix different RAM brands in my laptop?
Yes, absolutely. Mixing Crucial, Kingston, Corsair, and Samsung RAM is perfectly fine—there’s no compatibility issue. However, for maximum stability, use matching pairs of the same brand and capacity. Mixing capacities (e.g., 8GB + 16GB) can sometimes cause issues on older laptops, though most modern laptops handle it without problems.
How much RAM do I need in 2026?
For most users: 16GB is the sweet spot in 2026. It handles everyday tasks (browsing, email, office work), video calls, light photo editing, and most games without breaking a sweat. For content creators, video editors, or software developers, 32GB is ideal. If your laptop shipped with 4GB or 8GB, upgrading to 16GB will make a noticeable difference.
Is DDR5 worth upgrading to?
Only if you’re buying a new laptop or if you have both DDR5 slots free. If your laptop uses DDR4, stick with DDR4—DDR5 is faster, but most real-world applications won’t show a performance difference. DDR5’s advantage becomes apparent in heavy multitasking and creative workflows. Since you can’t upgrade from DDR4 to DDR5 without replacing your entire laptop, the decision was made for you when you bought the machine.
Will upgrading RAM void my warranty?
Generally, no. Opening your laptop to upgrade RAM yourself rarely voids the warranty in the UK or EU—consumer protection laws say manufacturers must prove that user modifications caused the damage. However, some premium brands (Apple, for example) may use this as grounds to deny warranty claims. Check your laptop’s specific warranty terms, or contact the manufacturer before opening it if you’re concerned.
Can I upgrade from DDR4 to DDR5?
No. DDR4 and DDR5 are incompatible at the hardware level. They have different notch positions, different electrical requirements, and different slot designs. You cannot install DDR5 modules into a DDR4 laptop or vice versa. If you want to upgrade to DDR5, you need a new laptop that supports it—you can’t retrofit an old machine.
How long does a laptop RAM upgrade take?
For experienced users: 10–15 minutes. For first-timers: 30–60 minutes. The actual installation (removing old RAM, inserting new RAM) takes only 2–3 minutes. The rest of the time is spent opening the laptop carefully and re-securing the panel. Don’t rush—there’s no benefit to speed here, and haste leads to mistakes.
Do I need to reinstall Windows after upgrading RAM?
No. Windows automatically detects new RAM and uses it immediately upon reboot. No reinstallation, no drivers, no configuration needed. Just shut down, upgrade, power on, and you’re done. This is one of the reasons RAM upgrades are so elegant compared to other upgrades.
What happens if I install incompatible RAM?
Most likely, your laptop simply won’t boot—it will power on but show no display and may produce beep codes. This won’t damage your laptop; it’s a safety feature. Remove the incompatible RAM and reinstall the original module, and everything will work again. Incompatible RAM is usually wrong DDR type (DDR5 instead of DDR4), wrong speed, or wrong form factor.
Related Guides
Want to dig deeper into laptop upgrades? Here are some related guides on Computer Compatibility:
- Laptop RAM Compatibility Guide — DDR4, DDR5, LPDDR5, SODIMM explained
- Laptop SSD Compatibility Guide — Step-by-step SSD upgrade instructions
- Laptop Battery Replacement Guide — How to replace a worn-out battery
- Dell Laptop Upgrade Guide — Dell-specific RAM, SSD, and charger compatibility
- Lenovo Laptop Upgrade Guide — Lenovo ThinkPad and IdeaPad upgrade advice
- HP Laptop Upgrade Guide — HP Pavilion, Envy, and ProBook upgrades
- ASUS Laptop Upgrade Guide — VivoBook, Zenbook, and ROG upgrade instructions
- Laptop Charger Compatibility Guide — USB-C, Power Delivery, and GaN chargers explained
Try Our Free Laptop Upgrade Checker
Not sure if your laptop can be upgraded? Use our Free Laptop Upgrade Compatibility Checker to find out instantly. Simply enter your laptop model, and we’ll tell you exactly which upgrades are possible—including supported RAM capacity, SSD compatibility, and charger specifications. No technical knowledge required.
Launch the Free Compatibility Checker
Affiliate Disclosure
This page contains affiliate links to Amazon UK. When you click a link and make a purchase through Amazon, we earn a small commission at no extra cost to you. This helps support our site and allows us to continue creating free upgrade guides for laptop owners. We only recommend products we genuinely believe are high-quality and reliable. Thank you for your support!